I get a lot of questions about wiring motorcycles. Sometimes people are just trying to fix their blinkers and aren’t familiar with how motorcycle electrics work – but more often than not I get requests about trimming down electronics for custom riders.
An essential part of building any sort of chopper, bobber, cafe racer, brat bike, or rat rod is getting rid of all the unnecessary items. These days I just grab my wire snips and start trimming away with no regard for common sense and caution – but if you are working with your first wiring loom I’m going to try and give you some guidance right now.
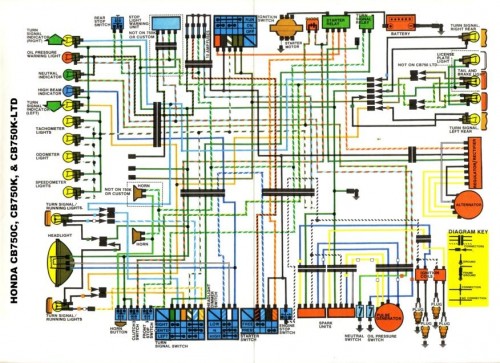
You might have checked the wiring diagram for your bike already and seen something like this:
The above diagram is from a Honda CB750 Custom dual cam bike. Lots of 70’s and 80’s bikes will look the same, especially the four cylinders.
If you are trying to build a stripped down bike there is a lot going on that you don’t need. A lot of the controls can be removed, blinkers, gauges and indicators, relays and switches. It doesn’t take a whole lot of wiring to keep a bike on the road, especially if you don’t want to cater to the law word for word. By trimming down the wiring you’ll be saving complexity, saving weight, and cleaning up the look of your bike.
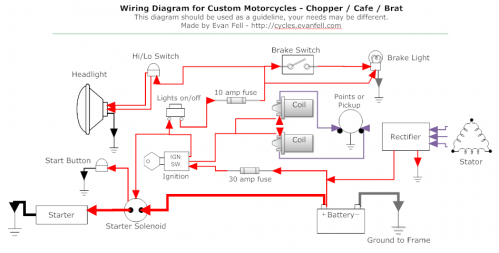
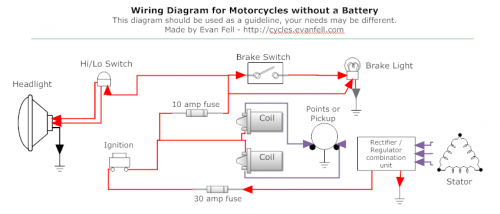
Below is a generic wiring diagram I whipped up that can be used as a guideline. I tried not to tailor it specifically to any particular model of bike, and I tried to make it as easy to understand as possible – but really any 70’s and early 80’s model bike with carbs will adapt to this diagram quite well. This diagram is setup to run a headlight and brake light, keep your battery charged, and have a keyed ignition. Personally, I sometimes strip my bikes even further, but I’ll mention that further down the page.
When working on your existing wiring loom it is best not to just start cutting wildly (like I do!) but to be very careful. Inside your headlight is where much of the wiring converges, so is a good place to start. Remove your headlight and start trimming back the sheaths. Slice back the sheaths of the wiring loom as far as possible to expose the wires inside.
If this is your first electronics exploration, start with something easier. Pick a fixed item you’d like to remove and trace the wires. An easy starting point is the blinkers. To remove your blinkers, unbolt them one at a time, then trace the wires through the cut open sheath. The grounding wire will most likely be shared with your headlight and gauges depending on the bike, so don’t trace the black wire, just unplug it. But, you should be able to follow the positive lead from each blinker all the way to the flasher relay which will be near the battery and rectifier under the seat. You can remove all of this wiring, the relay, and of course the blinkers.
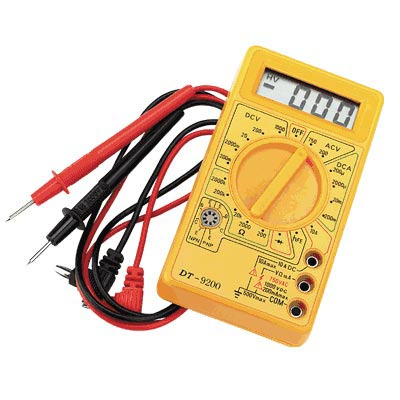
Keep going one item at a time. You should DEFINITELY be using a volt meter. IF YOU DO NOT HAVE A VOLT METER GO BUY ONE NOW! You can buy a cheap volt meter from Harbor Freight or Northern Tool for around $10 that will look something like this:
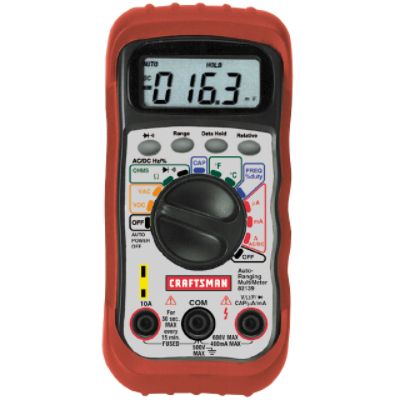
It will do everything you need. Or if you are a stickler for high quality tools like I am you can spring for something like a Craftsman Multimeter for around $50-60. This is what I use – though I must state, I only use 10% of what this device is capable of.
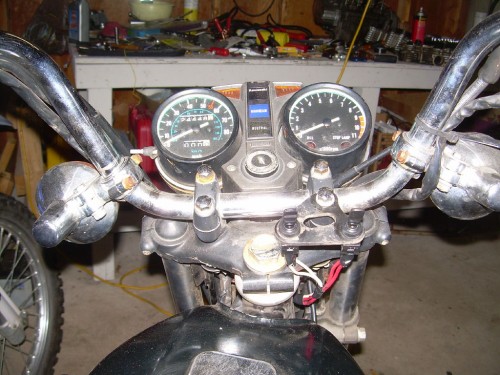
It should be noted that my diagram caters to my desires – I generally remove the switch controls on the left side of the handlebars, and the ones on the right if possible (often times the throttle housing and switches are a single unit). I replace my controls with simple switches picked up from radio-shack, and mount them where ever pleases me at the time. Sometimes I’ll make a little plate to mount them on the dash:
Or sometimes I’ll just stick them to the headstock, or under the seat so they are out of the way completely. The above KZ440 I didn’t remove a lot from. In this picture I had one switch overriding the keyed ignition, and another activating the starter. It was kind of a weird setup, but the only photo I have handy.
But anyway…..
When removing things you always want to make sure they are either not being utilized or serve no essential purpose. If you have the bike running and you’re watching voltage on a particular item (for example: a neutral switch), you’ll understand when it’s being used and when it isn’t and this will help you make a decision of whether or not it should be cut out.
I will usually ditch the:
- Gauges
- Ignition
- Blinkers and Flasher relay
- Left controls (right side depending on throttle setup)
- Side stand switch
- Oil pressure switch
- Neutral switch
- Maybe a front brake switch depending on the type
- License plate light
My general goal isn’t to be legal. You know what I’m after.
There is a lot more involved with doing a clean wiring trim than what I’ve mentioned here, but hopefully this helps push you in the right direction. If you have questions, please ask them either here in the comments or on my new Motorcycle Repair Forums. I do my best to help out everyone who posts.
Also – for some of you who are more adventurous and are looking for a hardcore diagram for modifying a kickstart only bike to run sans battery – have a looky:
I won’t explain the above right here right now – but if you’re looking to go as low profile as possible and have questions, please let me know. On many bikes you’ll need to introduce a capacitor or two and possibly a particular regulator unit.
Cheers!
-Evan
ADDENDUM:
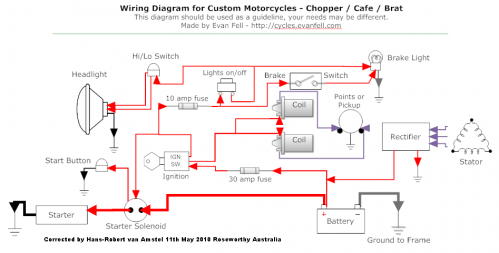
A reader recently had a very note worthy comment. My diagrams above have the brake light controlled by the same switchable power source as the headlight. This means that you must turn on the headlight for the brake light to be active. While I tend to like this setup – it isn’t necessarily the safest. If you forget to turn on your lights, your brake light won’t work. Hans graciously sent me an edited version of my diagram with the adjustment on it. Have a look:
to clarify.. If Negative ground – Negative side of Coil goes to Points .. Is this correct ??
[Reply]
Hi, I’ve been trying to build a quad for a while now, had to learn to weld and basically learn everything from scratch. I bought a 2008 250r ninja engine, had a loom ext and injection carbs but I really just wanted to remove all the loom and injection carb which I have done and replaced with a 250 zzr carb, I made my own loom which took some doing when you know nothing! But I managed to get 2 cdi units and actually got the plugs to spark and the engine to turnover!, it misfires splutters a bit but no luck! But then found that the plugs where not sparking correctly but more like takers sparking like lightning?. Can anybody please help me?..
[Reply]
Hi blogger i see you don’t earn on your page. You can earn additional bucks easily, search on youtube for:
how to earn selling articles
[Reply]
Awesome write up! Exactly what i was looking for. Question. I have 1978 suzuki gs550. Before i start tearing down do i need any additional capacitors of any sort to run bike without battery.
[Reply]
I have noticed you don’t monetize your page, don’t waste
your traffic, you can earn extra cash every month because you’ve got hi quality content.
If you want to know how to make extra money,
search for: Boorfe’s tips best adsense alternative
[Reply]
No, your headlight will run dim at idle with out a capacitor from generator.
[Reply]
Great article! I’m still a little fuzzy about wiring, but I have a 2002 XVS 650 and a 1979 XS1100 that I’m turning into brat-bobs. For the XS1100 there is a kick start back p. You’re saying that I can remove the ignition switch, starter, button, and everything associated and just start her up with the kick start? That would be awesome if I could. The guy I bought it from lost the keys, so I’d like to be able to just bypass the need for one. Thanks!
[Reply]
I have checked your blog and i have found some duplicate content,
that’s why you don’t rank high in google’s search results,
but there is a tool that can help you to create
100% unique articles, search for: Boorfe’s
tips unlimited content
[Reply]
I see you don’t monetize your website, don’t waste your traffic, you
can earn extra bucks every month because you’ve got high quality content.
If you want to know how to make extra $$$, search for: Ercannou’s essential adsense alternative
[Reply]
Earthing-
All stock bikes run neg/earth cables back to the neg on the battery, which is (usually? Always?) attached to the frame.
I was thinking (and it looks like your diagrams support this) that we dont need to run extra cable, if we can just attach to the closest bit of frame.
Thought?
[Reply]
MOST American/Jap bikes are Negative Ground
English bikes like Triumph, BSA, Norton etc are Positive Ground
[Reply]
HELP!!! (don’t you love a comment that starts out that way?) I’m currently building a motorized bicycle, a little 2 stroke, no electric start, but I have a battery that is all by itself for running lights. I’m trying to wire up a head light, turn signals, a couple of short LED strip lights for running lights in the rear, a brake light and a horn. Aside from the actual lights, a battery, and some wire, I have no idea what I need or where to start. Can you help me figure out a wiring diagram and tell me what pieces I need, like solenoid, rectifier, etc. (I vaguely know what those words mean) I have handlebar controls for on/off lights, Hi/Lo, turn signals, horn, kill switch (which I think connects to CDI, although various people have said NEVER use the kill switch to stop the engine), and I believe the brake handle is wired to light up a brake light. Any help will be greatly appreciated.
[Reply]
Hi. I see that you don’t update your blog too often. I know that writing articles is
boring and time consuming. But did you know that there is a tool that
allows you to create new articles using existing content (from article directories or other websites
from your niche)? And it does it very well. The new posts are high quality and
pass the copyscape test. You should try miftolo’s tools
[Reply]